Showing posts with label Yin Yoga. Show all posts

Friday, December 5, 2014

Dangling

I know what you're thinking...wait, this is a forward fold?!  When we practice yang yoga, which is the yoga most are familiar with, then you're right, it is!  We usually take this posture when we flow through our practice of warming the muscle. Forward Folds are also encouraged with straight legs.

Dangling is YIN YOGA.  This where we work the ligaments, joints and fascia.  We just hold postures, in a room that's not heated and practice stillness in our postures versus movement.  This version is not to stretch the hamstrings a lot, but rather to release the low back.  If the legs are straight, it is a nice stretch for the hamstring, but there is some muscular effort needed.  If the knees are bent, it is a great strengthener for the thigh muscles and allows the back to release more fully.  - excerpts from "Complete Guide To Yin Yoga" by Bernie Clark

Dangling

  • Stand, with feet hip-width apart.  Bend your knees and fold forward.  Clasp the elbows with opposite hands.
  • Bend the knees more, and this will strengthen quads and release the back.
  • Rest elbows against a table, chair, or on te thighs if it strains your back.
  • Work up to holding this posture for 5 minutes.  Start with one minute.
Bend the knees a lot, and roll to standing, very slowly, with breath.

*Try balancing your weight forward a little on the toes, or back on the heels.  Very gently move and don't bounce.
*You're belly may rest on the thighs, if you're flexible.

Contraindictions:
  • Avoid if you have high blood pressure. 
  • Move slowly in and out of this posture if you have low blood pressure
  • If you have a bad back, bend your knees a lot.  You may also rest your knees on your thighs.
  • If you struggle with rounding your back: keep your back straight and bend the knees more.
A wonderful counter-pose to this posture is a squat/Malasana/Garland Pose

Tuesday, October 7, 2014

Child's Pose - Balasana


Child's Pose is a common posture taken in Yoga.  I immediately think of being a child or of my children when I see this pose.  It's an amazing pose to take as it's an opportunity to come back to myself.  It can an incredibly calming posture!  In the beginning there were aspects of this posture that was difficult for me and sometimes finding comfort here was a challenge.  Do not worry if this happens to you.  I've found that children visit this pose all the time!  As we grow into adults, we get out of the habit of this.  Our bodies become tense, tight and full of tension and stress and our ability to fold ourselves into a little ball is foreign for a little while.  As we practice this, our spirits remember and we find peace.  So... in the beginning, this may be just fine for you, but if you struggle, take it slowly.  Rest in this posture with breath and mindful focus for as long as you're able before moving out of it slowly.

As I move into my practice, and even in life, I move outside my normal comfort zone and challenge myself.  I learn, grow, change, and become stronger.  However, like a long night of rejuvenating rest to recover and restore, Child's Pose calls me home.  It is an opportunity to come back to me, to reflect and turn inward to those things I've learned about myself from my adventure outside.  It's an opportunity to find my breath.  


“Home is where you go to find solace from the ever changing chaos, to find love within the confines of a heartless world, and to be reminded that no matter how far you wander, there will always be something waiting when you return.” 
― Kendal Rob


Child's Pose
** There are many variations, pictured a few I enjoy.  Feel free to move into the variation that calls to you.

1- From a tabletop position (hands and knees on mat).  Bring your knees to the *width of your mat, big toes touching.
2- Begin to draw your sits bones down toward your heels.  If you feel pain or discomfort, you may place a blanket behind the knees.  If you feel pain in your knees, kneel on a blanket or extra mat for relief.
3- Bring your forehead down to the mat, with hands extended out in front of you, palms down OR down by your sides, palms up.
4- Relax your jaw and neck.
5- Breathe.
*Variation - Keep your knees closer together as you sit back on your heels.


Wednesday, August 6, 2014

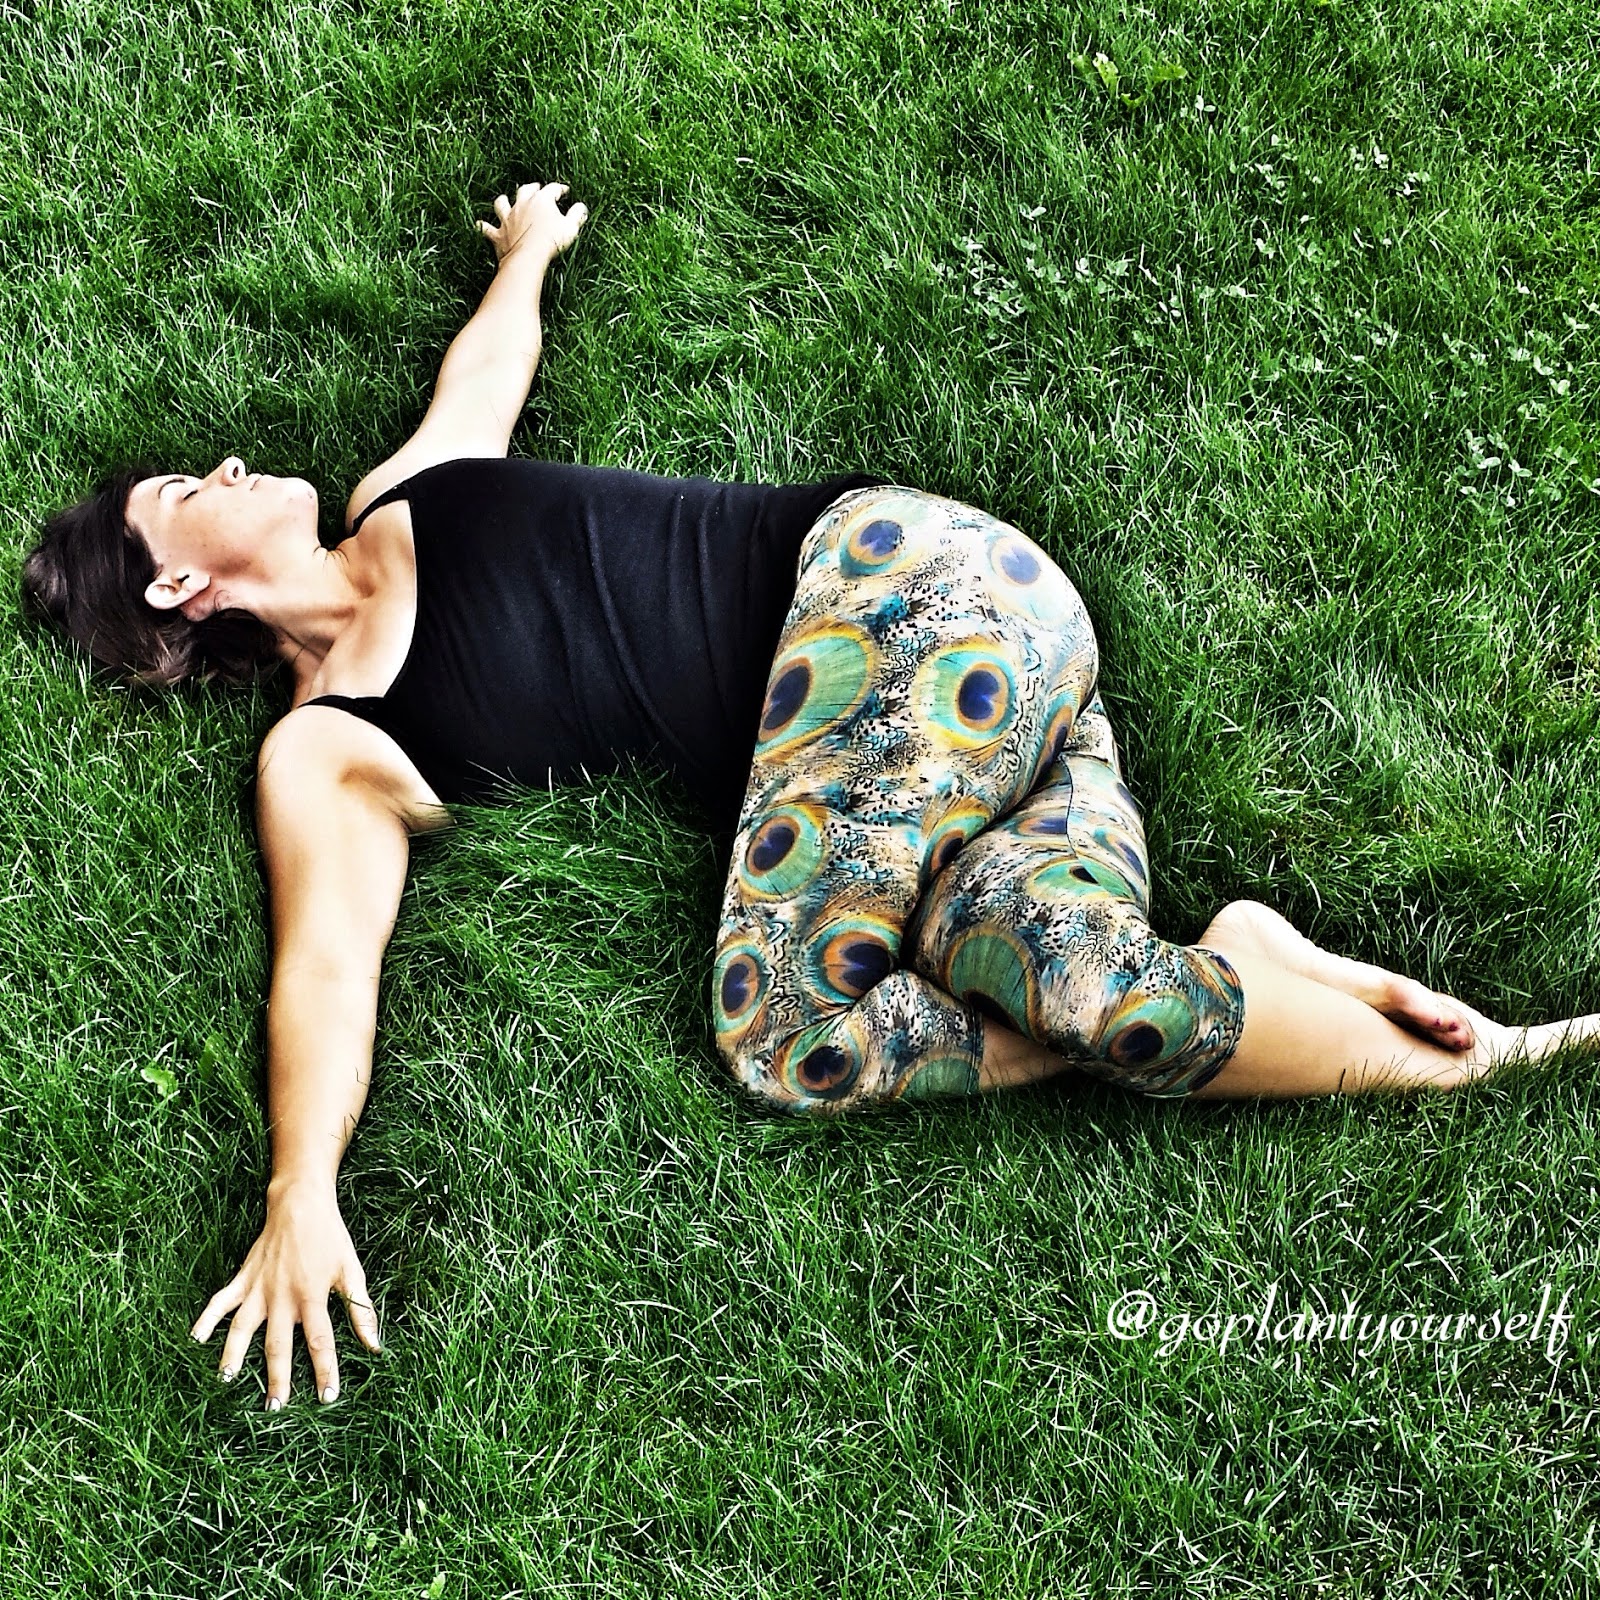
Reclining Twist

Twists bring amazing benefits to our spine and internal organs.  They relax the nervous system.  Twists have amazing detoxifying benefits not only to our physical self, but also to our emotional well-being.

Usually when we think about flexibility of the spine, we think of heart-openers and back bends.  One of the most vital parts of spine flexibility happens in our twists.

It's very important to take gentle twists at the beginning of our practice and as we move into our practice warming the body, we may then find more space and may move deeper. By then end of our practice, our bodies are craving the sweet blissful feeling of a reclined twist.  I enjoy taking these twists right before my final pose - Savasana.  Also, any seated forward fold also feels lovely after a reclined twist as this resets the spine and brings some relief to the low back right before Savasana.

Yin Yoga - A note about practicing twists at the end of your Yin Yoga practice...please don't go too deep.  As you move into a reclined twist as shown in these pictures, keeping knees together isn't super important. Go in as deep as you feel you need. Move very slowly into this twist and move extra slow as you come out of it.  *click on Yin Yoga for more details.

Moving into a Reclined Twist:

  • Lying on your back, bring your knees into your chest and give them a gentle hug.  Allow the low back to release and relax before slowly bringing your knees right or left.
  • Lay your arms out to the sides of you, or bring opposite hand to gently rest over opposite top knee.
  • After a warm yang practice, keep your knees together (unless pregnant) as you slowly allow the knees to gently twist to the right or left.  Your opposite shoulder may come off of the ground, if this puts stress on the shoulder, don't worry about knees being together until you feel release in the spine and may move deeper, then bring the knees closer together, allowing a deep twist in the waist.
  • If your knees are twisting to the right, your right shoulder may get bunched up underneath you.  Bring right hand to your knees and gently untuck that shoulder, helping you to find more space in your midsection for this twist.
*Variations - There are many variations to a reclined twist - 

Crossed Leg Twist - keep your feet on the ground and cross one knee over the other, as if you were sitting cross legged, and then slowly recline in the direction of the leg underneath you, for instance, if your right knee is crossed over your left, you would then twist to the left, bringing left hand over right knee, if you so desire. (Pic below)

Crossed leg over straight leg
- Draw one knee into chest, lets say the left knee, keep the right leg long and straight. Opening your arms out to the sides of you but not above your shoulders, bring your left toes to the inside of your right knee and gently touch them there as you roll twist over to the right, onto the outer right hip.  Allow that top left knee to gently come down to touch the mat or floor, and relax the legs here.  Try not to hold stress in any part of your body as you twist.  Allow the left shoulder to open and bring your gaze over to the left, if that feels good to you.  All of the same suggestions for explanations on twist above apply.  

*A note if you're pregnant.  Deep twists can be harmful during pregnancy.  Listen to your body as you move into twist.  It doesn't have to be a deep twist for it to have some of the same benefits.  Keep the twist more in the mid to upper spine versus the low back.  Avoid twisting from the waist or low back deeply.

Monday, August 4, 2014

Swan & Sleeping Swan

Swan & Sleeping Swan

*** Do not practice this if you have bad knees, especially the inner meniscus.  Watch how much pressure is put on the knee, using props like bolsters or blocks to help.  Practice when cleared by your physician. - If your hips are too tight, that is where the pressure goes - to your knees.  Bring the front foot in more toward your thigh, if not bringing the front foot under your hip or front thigh.

To come into the pose: From hands and knees or Down Dog, bring one knee forward in between your hands and allow that front foot to slightly move in toward the other hip, extending the leg behind you.  Keep your hips square, aware that one hip isn't raised or opening out to the side.

Swan Pose
This posture is a hip opener, hip flexor stretch and a moderate back bend, compressing the low back.  
* Make sure your back foot isn't turned in and that your back foot is a straight extension of the leg.
* Walk hands or finger tips back toward the hips.
** As this is a back bend, pay close attention to your low back and any pain that may be there, walk the hands forward again.
Spend 1-3 minutes here, then move to Sleeping Swan

 Sleeping Swan
(shown below)
Alternatives & Options:
* To protect the front knee, keep the foot flexed before coming forward.
* Use a block under the hips or right under the buttock of the front leg, if you are not as deep into this posture as shown in my pic.  You could also lay on a bolster or pillow under chest.
* If you are flexible, bring the front foot forward, laying your chest on your front shin.
Spend 1-3 minutes in Sleeping Swan

Coming out of the pose:  Use your hands to push the floor away and come out as gently as you entered.  Move into a gentle Down Dog. After Down Dog, feel free to spend some time in Child's Pose or Windshield Wipers (seated or lying down) before moving to the other side.


What is Yin Yoga?

Yin Yoga involves stretching joints, ligaments, & Fascia.  Most forms of yoga today are active and sweaty, they involve fluid movement or held postures, that create heat within the body.  This is a "yang" form of yoga and works primarily with the muscles of our bodies.  The whole idea behind yoga in the first place is to create balance.  In every aspect we are working on balancing the mind, the body, & the spirit. So, even as we practice in a "yang" way, we adopt a yin awareness, allowing us to bring balance as we practice in any setting. Breath is one way to find yin amongst a vigorous yang practice. "Within our bodies, if we use the context of position or density, the yang tissues can be seen as our muscles, blood, and skin compared to the yin tissues of ligaments, bones and joints.  The contexts of flexibility or heat could also be used: muscles are elastic, but bones are plastic.  Muscles love to get warm, while ligaments generally remain cool." - The Complete Guide to Yin Yoga - "This is why braces must be worn for a long time with a reasonable (but not always comfortable) amount of pressure, in order to reshape the bones of the jaw."

"Generally, one of the muscles' jobs is to protect the joint; if there is too much stress on the joint, the muscle will tear first, then the ligaments, and hen finally the joint itself may become damaged.  Yang yoga is designed to not stress the joint.  This is why there is so much care taken to align the body and engage the muscles correctly before coming into asanas in the yang practice. However, Yin Yoga is specifically designed to exercise the ligaments and to regain space and strength in the joints.

30 percent of what we call our muscle is actually fascia.  Fascia within our muscles that govern the muscles' range of movement while it is our muscle cells that govern their strength.  Yang creates the strength within the muscle, the yin part of our practice, the holding of the pose, that provides length."

It is so important to stress the importance of gently holding these postures, moving SUPER SLOW, in and out of them.  Do not bring a yang aspect to your yin practice, meaning: fluid, faster movement or holding a muscle in a contracted state for a long period of time.  We tighten our muscles to protect our joints.  We relax our muscles so we can exercise our joints."

As with any exercise, it is so important to --- REST!  Take time to work different parts of the body in different ways.  Adopting a Yin day, resting the Yang aspect of your practice is important.  I also have found great benefit in taking at least a day or two "off" of exercise in general.

One of the greatest points to our yoga practice is to remain as much as possible in a meditative state in order to decipher what arise as we practice.  What do you feel?  What are you thinking?  Is there a particular part of your body that you are holding stress and tension?  Why?  As we allow the mind to be clear and focused, we are more adapt to quickly identify these aspects as we practice.

One aspect of yin yoga is to meditate. To sit for long periods of time, undisturbed, requires a body that is open and strong.  This opening in the hips and back, comes from an aspect of practicing yin.  So, if you plan on reading a book, or doing some study, or even just to meditate in calming the mind and focusing on breath, sit in easy pose (Indian style), lengthen your spine, and bring breath and discipline to body and mind and your practice stillness.

When to practice Yin Yoga? 

  • When our muscles are cool
  • Early in the morning
  • Later in the evening before bed
  • Before an active yang practice
  • In the Spring or Summer (which are yang times of the year)
  • When life is crazy and hectic
  • After a long trip (traveling is very yang, even if we are sitting)
  • During a woman's menstrual cycle
Do not's:
  • If you are pregnant (pregnancy loosens the joints naturally, and could cause harm to the joint)
  • High blood pressure, diabetes or other cardiovascular diseases
  • Recent surgery
  • Epilepsy
  • Don't wear perfume or cologne.  Essential oils are AWESOME to use for practice! (Deep breath is important, make sure what you breathe in is wholesome and natural)
  • Do not eat anything for at least one hour before and no big meals for a couple of hours after.
  • If you are physically exhausted, refrain from from practice or keep it short and gentle.
  • Prolonged exposure to sun before practice (again, we are avoided warmth to the body)
  • Remove jewelry
  • Shut everything off, and practice in a quiet and calm atmosphere.  Create this for yourself :)
  • Avoid drafts and cold flowing air.
Do:
  • Shower beforehand, if you'd like
  • Empty bowels
  • Wear loose, comfy clothes
  • Wear extra layers of clothes or socks, if you are cold or tend to get cold.  You will not be heating the body.  You will be holding postures, WITHOUT contracting the muscles.
  • Breathe - Soft Ujjayi breath or complete breath
3 Important things to remember when practicing Yin:
  1. Come into the pose to an appropriate depth.  It will be unique for you.  One part of your body may be more open while another may be tight.  Come to YOUR edge. Remember your edge day to day is different.  It's so important to feel your edge...and then INVITE your body to go deeper when it allows. You don't need to go any further if you are already feeling a significant stretch, compression, or twist.  Going further is a sign of ego; staying where you are is embracing yin.
  2. Remain still.  Try not to fidget.
  3. Hold the pose for time.  Have a timer near you and use it :)
"We don't use our body to get into a pose,
we use the pose to get into our body."

THREE KINDS OF STILLNESS
Of the body, like a majestic mountain
Of the breath, like a calm mountain lake
Of the mind, like the deep blue of the sky


Dragon Pose - Yin Yoga


This is a posture used in both Yin & Yang practice.  The idea behind Yin is to exercise the joints.  It is very important when practicing Yin Yoga, to focus on correct alignment.  This is true for any form of exercise, right?!  More on Yin to come.

This pose is called Dragon.  This is a deep hip and groin opener and gets right into the hip joint.  It stretches the back leg's hip flexors and quadriceps.  This can be very uncomfortable on the knee, so feel free to place something soft under the knee that will be on the mat.  It's VERY IMPORTANT to keep the front knee aligned with the ankle!

To get into this pose, you will begin on hands and knees or in Down Dog.  Step one foot forward between your hands.  Walk the front foot forward to align the knee over the back heel or ankle.  Slide the back knee as far as you comfortable are able.  There are many options for holding this posture. Be sure to work on holding this posture for 1 minute.  The idea is to bring calm or soft Ujjayi breath.  As with any Yoga practice, empty the mind with focus on the breath, attaching a color to your breath, or inhaling a favorite smell that brings you peace.  As you do so, allow the body to relax as much as possible.  Avoid fidgeting.  As you hold this posture, you will feel a little release and may be able to move deeper.  "Play the edges of your body & mind" in Yin postures.  If you feel sharp pain, or pain that begins to radiate or if you feel your legs or any part of your body begin to get tingly, like it is falling asleep, gently move out of the posture.  

Hold ONE version of Dragon for at least one minute, working up to more...3-5 minutes.  You may hold each option of this pose as you move deeper for 1-2 minutes, cycling through them all, if you wish.  Make sure you take a counter posture (listed at the end) before moving to the other side.

Options for this posture:
  1. You may keep the hands on either side of the foot, pressing the top of the back foot down firmly.  Keep that back foot straight, pressing through the second little toe. Allow the hips to soften, as you reach the "edge" of your stretch.
  2. Low-Lunge or Baby Dragon - (shown in picture): Bring your hands to the inside of that front foot.  As you begin to go deeper, you may move to your forearms, placing them on a block.  You may also place another block lengthwise, so it is higher than the block you're resting your forearms on and rest your head.  Keep your front knee in close to your armpit.
  3. In Baby Dragon - allow that front knee to fall out to the side, even allowing the front foot to roll outward onto the outside of that foot.  
There are other options for this posture that go quite deep.  In time I will be adding these with pictures.

Coming out of this pose: Move slowly out of the pose the way you came in.
Counterpose: Down Dog or Child Pose feel wonderful for a minute before moving to the other side.